A Closer Look at OAS V17 Security Hardening

OAS V17

Security has always been a top priority at Open Automation Software and we are continually reviewing and enhancing our security practices to stay current with the latest technology. Version 17 of the software has included some next-level enhancements to ensure that we are THE platform you will want to trust your SCADA system to.

Secure software relies both on the developer and the end user. Security must be built into the software foundation and the end user must use the security features provided. OAS has always provided that secure foundation and Version 17 has upped the game and also made end user utilization of security features a priority.

Pre-Configured Security Groups

The software now loads with a pre-configured Admin Security Group.  Upon installation, users are prompted to create an admin user and access is prohibited until that admin user has been created.  Security is now only configurable by an authenticated user with assigned access to this feature.  The Default security group, for unauthenticated users, is now locked down allowing only limited functionality.  OAS has always allowed the creation of multiple Security Groups where administrators can secure any feature, even down to the individual tags and tag groups.  This remains and continues to allows end users to customize security to meet their needs. 

User Credential Encryption

User Credential Encryption

Version 17 of OAS has widened encryption strategies to include database authentication, user credentials and all configuration calls.  V17 implements a new encryption methodology that allows it to provide extended encryption utilizing AES encryption while increasing the speed of data transfer.

Secure Client Server Handshaking

Secure Client Server Handshaking

Each client server transaction now includes a unique 64-bit identifier allowing OAS to securely transport your data.

Data Packet Encryption

New Data Packet Encryption

In addition to broadening the scope of encryption, V17 of OAS had entirely reworked its encryption process.  Data packets are now 3-9 times smaller allowing for much faster transfer speed.  This new method provides superior security and gets it done faster!

Security Updates

The following is information which address known issues that have been reported.

In most, if not all cases, issues reported can be corrected by upgrading to the latest version of the OAS Platform. If you have any concerns or are experiencing an issue not listed below, contact our technical support team at support@oasiot.com.

The latest release of OAS contains several improvements that harden security and make communications even more efficient.
Read more about these improvements here.


CVE or Ref. NumberDescriptionVersions AffectedStatus
CVE-2022-26082
CVE-2022-26303
CVE-2022-26043
CVE-2022-26077
CVE-2022-26026
CVE-2022-26067
CVE-2022-27169

A vulnerability was reported in the OAS Engine API calls of Open Automation Software OAS Platform V16.00.0112.

Recommendations:
Upgrade your server to v17.
For prior versions, ensure the Default security Group is disabled and access to the OAS platform features are limited by assigning only necessary rights to additional security groups and users

Versions prior to v17Corrected in v17
CVE-2022-26833

A vulnerability was reported in the OAS Engine REST API calls of Open Automation Software OAS Platform V16.00.0112.

Recommendations:
Upgrade your server to v17.
For prior versions, ensure the Default security Group is disabled and access to the OAS platform features are limited by assigning only necessary rights to additional security groups and users.
This vulnerability only exists when security is not enabled on the OAS server. As always, with Web HMI and REST API implementations, always enable SSL on unsecured networks.

Versions prior to v17

Corrected in v17

CVE-2023-31242
CVE-2023-34998
CVE-2023-34353

Network-based authentication vulnerabilities identified.

Recommendations:
Issue resolved in v19.00.0000. Authentication calls and packets have been further secured. Upgrade to v19 or later.

v18.00.0072Corrected in v19
CVE-2023-32615
CVE-2023-34994

OAS service is granted file system access with elevated permissions.

Recommendations:
Issue resolved in v19.00.0000. OAS access to file system is now limited to installation directories. Upgrade to v19 or later.

v18.00.0072Corrected in v19
CVE-2023-34317
CVE-2023-32271
CVE-2023-35124

Additional validation required on network update calls for configuration data.

Recommendations:
Issue resolved in v19.00.0000. Configuration calls and packets have been further secured. Upgrade to v19 or later.

v18.00.0072Corrected in v19
CVE-2024-24976Improper Handling of Length Parameter Inconsistency

Recommendations: OAS version 19.00.0064 has been updated to correct the file data source path assignment by removing the File Data Source Path and File Name properties. Th location and file name are now fixed.

v19.00.0057Corrected in v19.00.0064
CVE-2024-21870
CVE-2024-22178

External Control of File Name or Path.


Recommendations:
In OAS Version 19.00.0064 the Options properties to specify the File Data Source Path and File Name have been removed.

The path for File Data Source is now fixed to the directory C:\ProgramData\OpenAutomationSoftware\, subdirectory ConfigFiles\FileDataSource for Windows, and ConfigFiles/FileDataSoruce for Linux.
The File Data Source File Name is now fixed to OASTagValues.

The save security call has been removed and there is no longer a need specify the location or file name of the security file. Users can no longer specify the file name or location of the security file.

Upgrade to v19.00.0064 or later.

v19.00.0057Corrected in v19.00.0064
CVE-2024-27201

Improper Input Validation.


Recommendations: OAS version 20.00.0009 has been updated to restrict the user properties Security Group Name, Field1, Field2, Field3, and Field4 to only allow the use of letters, numbers, spaces, and characters ! # $ % & ‘ ( and ), . Upgrade to v20.00.0009 or later.

v19.00.0057Corrected in v20.00.0009

Restrict Tag Access

Access to tag data and the ability to see what tags are available can be restricted by user authentication or prevent unauthorized access.  The Security features can be used to designate tag groups or individual tags per organization, customer, or designation on how you determine to allocate users in OAS.

Before proceeding first follow the steps in the Getting Started – Security guide to create an Admin user.

When adding tags to OAS organizing the tags in groups by area or organization will make the security restriction easy to designate tags that start with a character string.

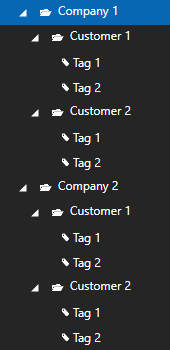
In the following steps we will use the example tag configuration demonstrate access to tags organized by company and customer.

Company-Customer-Tags

To restrict access to read, write, and browse tags use the Security group tab Tags, Read Tags, and Write Tags of the Default security group and allow access to the designated security group defined to each user.

Read Tags

Use Configure-Security to list all currently defined Security Groups.

Configure Security

Select the Default security group and uncheck Enable All Features.

Uncheck Enable All Features

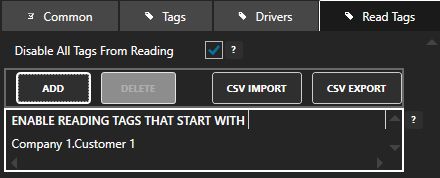
Under the Read Tags tab check Disable All Tags From Reading.

Disable Read Tags

Note: This will prevent all applications including remote OAS Engines to receive live values from this OAS Engine.

You can optionally enable specific tags or tags start with a matching string for read access without authentication required.

Enable Read Tags

Select Apply Changes to update the Default security group.

Apply Changes

Next create security groups for customers, companies, administrators full access privileges.

The first example create a security group for Customer 1 of Company 1.

Change the Group Name property of the security group, the group name can be anything you like, we will use Company 1-Customer 1 in this example.

In the Read Tags tab leave Disable All Tags From Reading unchecked.

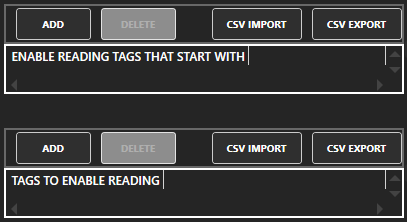
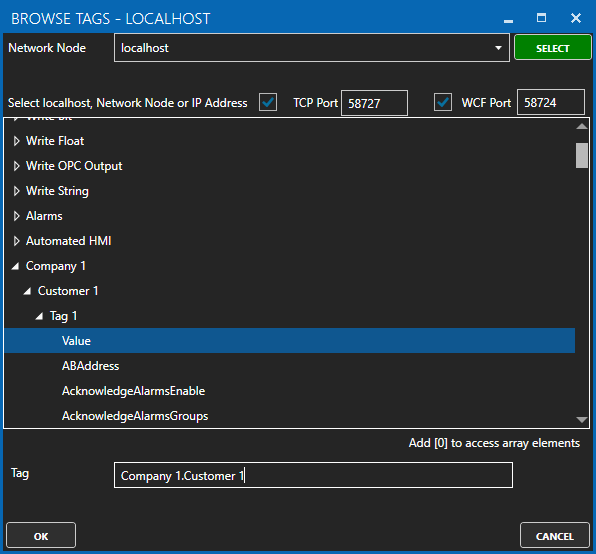
Select ADD in the list to Enable Reading Tags that Start With to browse for a tag within the Company 1.Customer 1 group and remove the tag portion of the string and select OK.

Browse Company Customer

This security group will allow read access to tags that start with Company 1.Customer 1.

Allow Read Tags Company and Customer

Note: If you wanted to provide company wide access to all customers set the string that starts with to Company 1.  If you want to provide read access to all tags in the configuration uncheck Disable All Tags From Reading.

You can also designate tags by complete name with the list Tags To Enable Reading.  This is a way to include specific tags within a tag group, but not all tags in the group.

Select Add Group.

Add Group

From the top menu select Configure-Users to define one or more users to the Company 1-Customer 1 group.

Configure Users

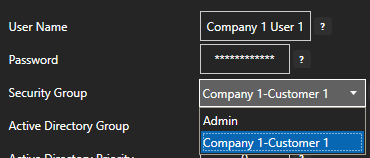
Enter a User Name and Password for the user that will have access to read tag from Company 1.Customer 1 tag group.

Use the Security Group pull down to select the security group you have defined for the Company 1.Customer 1 group.

Company Customer User

Select Add User.

Add User

Select Save to save a security configuration file.

Save

When prompted select to set as the default security configuration file.

Default Security File

Repeat the above steps for each customer in each company.

Note: To define multiple security groups and users you can use CSV Export / Import, .NET Server Configuration, or REST API.

CSV Import and Export

Write Tags

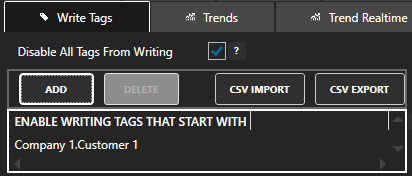
To restrict write access to tags per user use the same steps above as listed for Read Tags and use the Write Tags tab of the security groups.

In the Default security group check Disable All Tags From Writing.

Disable Write Tags

In each additional security group select ADD in the list to Enable Writing Tags that Start With to browse for a tag within the Company 1.Customer 1 group and remove the tag portion of the string and select OK.

This security group will allow write access to tags that start with Company 1.Customer 1.

Enable Write Tags

Note: If you wanted to provide company wide access to all customers set the string that starts with to Company 1.  If you want to provide write access to all tags in the configuration uncheck Disable All Tags From Writing.

You can also designate tags by complete name with the list Tags To Enable Writing.  This is a way to include specific tags within a tag group, but not all tags in the group.

Select Save to save a security configuration file.

Save

Browse Tags

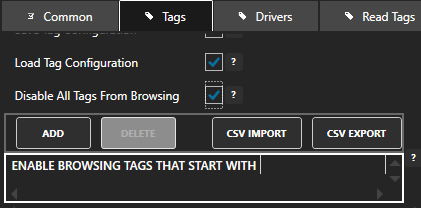
To restrict browse access to tags use the same steps above as listed for Read Tags and use the property Disable All Tags from Browsing in the Tags tab of the security groups.

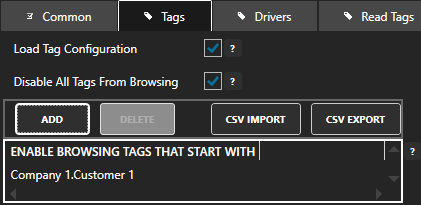
Check Disable All Tags From Browsing in the Default security group in the Tags tab and select Apply Changes.

Disable Browsing

Select Apply Changes to update the Default security group.

Apply Changes

In each additional security group select ADD in the list to Enable Browsing Tags that Start With to browse for a tag within the Company 1.Customer 1 group and remove the tag portion of the string and select OK.

This security group will allow browse access to tags that start with Company 1.Customer 1.

Enable Browse

Note: If you wanted to provide company wide access to all customers set the string that starts with to Company 1.  If you want to provide browse access to all tags in the configuration uncheck Disable All Tags From Browsing.

Select Save to save a security configuration file.

Save

View how to Implement User Credentials in Client Applications to provide log in method for each user.


How do I log in my client application with a user name and password?

For each application type there is either a login programmatic method or user interface dialog to log in the application.

  • Configure OAS application: Use the LogIn from the menu.
  • WPF application: Use the OPCWPFDashboard.OPCWPFLogIn component with the LogIn method.
    (Only need to do this once for the entire application)
  • WinForm application: Use the OPCControls.OPCControlsLogIn component with the LogIn method.
    (Only need to do this once for the entire application)
  • OPCTrend control in WPF or WinForm application: Use the LogIn method.
    (Need to do this for each trend control)
  • OPCAlarm control in WPF or WinForm application: Use the LogIn method.
    (Need to do this for each trend control)
  • Excel: Use the security login RTD formula generated with the OAS Excel Wizard application.
    (Only need to do this once for the entire Workbook)
  • HTML5 Web application: Use the authentication token see the Authentication topic in the Web HMI Programming Reference-HTML5 section.

Frequently Asked Questions – Security

How do I log in my client application with a user name and password?
For each application type there is either a login programmatic method or user interface dialog to log in the application.
  • Configure OAS application: Use the LogIn from the menu.
  • WPF application: Use the OPCWPFDashboard.OPCWPFLogIn component with the LogIn method. (Only need to do this once for the entire application)
  • WinForm application: Use the OPCControls.OPCControlsLogIn component with the LogIn method. (Only need to do this once for the entire application)
  • OPCTrend control in WPF or WinForm application: Use the LogIn method. (Need to do this for each trend control)
  • OPCAlarm control in WPF or WinForm application: Use the LogIn method. (Need to do this for each trend control)
  • Excel: Use the security login RTD formula generated with the OAS Excel Wizard application. (Only need to do this once for the entire Workbook)
  • HTML5 Web application: Use the authentication token see the Authentication topic in the Web HMI Programming Reference-HTML5 section.

Security Groups and Users CSV Export and Import

All security groups and users can be exported to a CSV file by right clicking on the Local service and select Export CSV.

Note: You cannot have Excel open with the CSV file during the import as Excel will lock the file for exclusive use. First close the file in Excel, and then proceed with the import.

Getting Started – Security

Security is implemented to restrict modifying configuration parameters and limit real-time and historical data access.

You can view the OAS Security video to familiarize yourself with the following steps to setup security.

  • 00:00 – Introduction
  • 00:19 – What Security is implemented for?
  • 00:27 – Security Groups
  • 00:44 – Creating an Admin User
  • 01:18 – Security Configuration
  • 01:44 – Configuring the Default Security Group
  • 02:29 – Creating a New Security Group
  • 04:26 – Set Up Alarms
  • 05:13 – Dashboard Tab
  • 05:22 – Reports Tab
  • 05:29 – Recipes Tab
  • 05:34 – UDP Broadcast Tab
  • 05:39 – Live Data Cloud
  • 05:46 – Security Tab
  • 05:57 – Options Tab
  • 06:03 – New Security Group
  • 06:43 – Saving the Configuration File
  • 07:31 – Restrict Tag Access
  • 010:59 – Implementing Security in a Client Application
  • 011:57 – Logins Methods
  • 012:08 – Tag Access Demonstration
  • 013:18 – Login Method
  • 014:15 – Log Off Method
  • 014:28 – Logging into Rest API
  • 015:12 – Web Applications
  • 015:34 – Provide Security to a remote OAS Service
  • 016:05 – Pass Security to the OAS OPC Server
  • 016:25 – Copy the file out of the directory
  • 017:05 – OAS Excel Security Option
  • 017:23 – More Information

The OAS Engine can have multiple security groups defined, each with a different level of access.

Each security group can have multiple users associated with it.
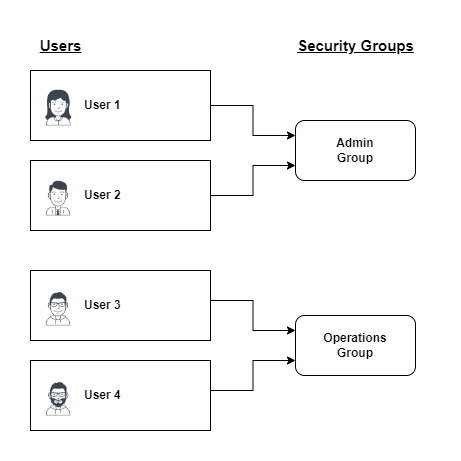
Users and Security Groups

Each user can only belong to one security group that is not the Default group.

In each OAS Engine there is a Default security group that is used to determine access level without a user specified.  If the feature is protected in the Default group then the security group defined to the User will be used to allow or deny access for the call made to the OAS Engine.
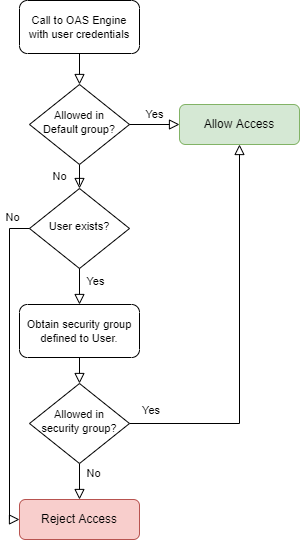
Security Flowchart

Following are the steps to setup security in the OAS platform.

Step 1 – Define Administrator User

On Windows, the admin credential was created as part of the installation process.
On Linux, an admin credential is created or reset using the AdminCreate utility found in the OAS installation directory.

To use the AdminCreate utility, execute the following:

chmod +x AdminCreate

./AdminCreate

You will then be prompted for the credential details.

NOTE: On Linux, if you used the installation script, it will create a user under which the OAS service will be running (default username of oasuser).
Running AdminCreate under the root user account will not update the security settings for the installed OASEngine. AdminCreate needs to be run while logged in as oasuser, and from within the installation path of that user.

After an admin credential has been created, select Log In from the menu and log in with the admin user you have just added.

OAS Log In

Log In

Select Save to save a security configuration file.

Save

When prompted select to set as the default security configuration file.
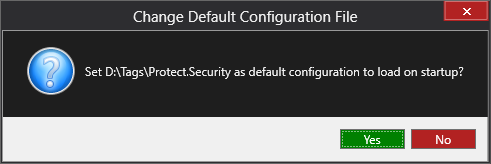
Default Security File

Step 2 – Set Default Security Access

Warning: Make certain to first add an Admin User in step 1 to all access and modification to the security configuration before disabling access and modification of Security in the Default Group.

The Default Security Group contains all of the security settings if a remote client application is not logged and is connected to the service.

Select Configure-Security.

Configure Security

Select the Default security group.

Select Default Security Group

Uncheck Enable All Features to restrict unauthorized access to add security groups and users.

Uncheck Enable All Features

Disable additional properties of the Default security group to restrict unauthorized access.

Select Save to save a security configuration file.

Save

Step 3 Create Additional Security Groups

Create security groups for customized access level to associate with a user or multiple users.

Change the Group Name property to the new desired security group name.

Group Name

Select Enable All Features to provide full access to all features or disable and set the desired access level for the security group under each of the tabs.

Click on the question mark next to the property to see a description of what the security property restricts.

Show Help Topic

Security Tabs

  • The Common properties are general features that are common to the entire OAS Service that can be restricted.
  • The Tags properties limit the creation, modification, removal, and browsing of tags.  Use Disable All Tags from Browsing to restrict which tags are available to users.
  • The Read Tags properties provide the feature to disable or enable real-time data access to Tags. You can either Disable All Tags From Reading and then Enable specific Tags, or leave all Tags for reading, but just Disable specific Tags.  The Read Tags properties affect real-time data access from HMI controls like OAS WPF HMI .NET, OAS WinForm HMI .NET and OAS Web HMI and also restrict real-time Trending and Data Logging on remote OAS Engines.
  • The Write Tags properties limit client applications from writing to Tags.
  • The Trends properties are for a few specific name retrieval functions for browsing trend tags and history fields.
  • The Trend RealTime properties help to limit access for real-time trending.
  • The Trend History properties allow restriction of history replay from clients.
  • The Data Log properties limit data logging configuration parameters from access and modification.
  • The Alarms properties limit obtaining the Alarm Group Names and adding alarms programmatically or editing alarm comments.
  • The Alarm Ack properties limit the ability to acknowledge alarms based on alarm priority and Alarm Groups.
  • The Alarm RealTime properties limit the ability to access the current alarms based on alarm priority and Alarm Groups.  This also restricts Alarm Logging and Alarm Notification of alarms on this OAS Engine on other remote OAS Engines.
  • The Alarm History properties limit the ability to access historical alarms from a database based on alarm priority and Alarm Groups.
  • The Alarm Log properties limit alarm logging configuration parameters from access and modification. To limit the actual alarms being logged use the Alarm RealTime properties.
  • The Alarm Notification properties limit alarm notification configuration parameters from access and modification.
  • The Dashboard properties determine what level of access is provided in the Web HMI Dashboard.
  • The Reports properties limit report configuration parameters from access and modification.
  • The Recipes properties limit the recipe configuration parameters from access and modification.
  • The Options properties limit the options configuration parameters from access and modification.
  • The Security properties limit the security configuration parameters from access and modification.

Select Add Group to add the new security group.

Add Group

Note: To define multiple security groups you can use CSV Export / Import, .NET Server Configuration, or REST API.

CSV Import and Export

Step 4 Define Additional Users

Define Security Users with Configure-Users to assign a Security Group to each User. You cannot define the Default Security Group to a User.

Configure Users

Similar to Step 1 above with different user names, unique passwords, and the desired security group to use for each user.

Note: To define multiple users you can use CSV Export / Import, .NET Server Configuration, or REST API.

CSV Import and Export

Select Save to save a security configuration file.  The security groups and users are saved in the one file.

Save

The Default Security Configuration to load when the OAS Engine starts can be set under Configure-Options-Default Files.

Configure Options

Step 5 Implement User Credentials in Client Applications

LogIn Method in .NET Applications

Each of the OAS .NET Assemblies have a LogIn method to call within your application to provide authentication to data in the OAS Engine.  If the Read Tags security feature is restricted and the LogIn is not specified the data quality on the client applications will be bad quality.  Other features may be restricted to acknowledge alarms or receive with the alarm control, view live or historical trend data, history, or access or set configuration properties in the OAS Engine.

Example use the OPCWPFDashboard assembly:

C#

OPCWPFDashboard.OPCWPFLogIn oasLogIn = new OPCWPFDashboard.OPCWPFLogIn();
oasLogIn.LogIn("UserName", "Password");
// Alternatively use the ShowUserLogIn method to prompt the user for a user name and password.
oasLogIn.ShowUserLogIn();

VB

Dim oasLogIn As New OPCWPFDashboard.OPCWPFLogIn
oasLogIn.LogIn("UserName", "Password")
' Alternatively use the ShowUserLogIn method to prompt the user for a user name and password.
oasLogIn.ShowUserLogIn()

Use the LogOff() method to clear the user credentials.

The above methods are applicable for the following assemblies and components.

  • OPCWPFDashboard.OPCWPFLogIn visualization in WPF .NET Framework applications.
  • OPCWPFDashboard.OPCWPFTrend for realtime and historical trending in WPF .NET Framework applications.  There is also a LogIn icon on the toolbar.
  • OPCWPFDashboard.OPCWPFAlarm for realtime and historical alarming in WPF .NET Framework applications.  There is also a LogIn icon on the toolbar.
  • OPCControls.OPCControlsLogin visualization in WinForm .NET Framework applications.
  • OPCTrendControl for realtime and historical trending in WinForm .NET Framework applications.  There is also a LogIn icon on the toolbar.
  • OPCAlarmControl for realtime and historical alarming in WinForm .NET Framework applications.  There is also a LogIn icon on the toolbar.
  • OPCSystems.OPCSystemsComponent for programmatic server configuration in .NET Framework applications.
  • OASConfig for programmatic server configuration in .NET Core, .NET 5, and .NET 6 applications.
  • OPCSystemsDataConnector.OPCSystemsDataLogin for programmatic data access in .NET Framework applications.
  • OASData for programmatic data access in .NET Core, .NET 5, and .NET 6 applications.
  • OPCTrendDataOnly for programmatic live and historical trend data in .NET Framework applications.
  • OASTrends for programmatic live and historical trend data in .NET Core, .NET 5, and .NET 6 applications.
  • OPCAlarmDataOnly for programmatic live and historical alarms in .NET Framework applications.
  • OASAlarms for programmatic live and historical alarms in .NET Core, .NET 5, and .NET 6 applications.

REST Authenticate

Use the Authenticate call with a user name and password of the OAS REST API to return a clientID and token from the OAS Engine.  the clientID and token are used in all subsequent calls to the OAS Engine.

Note: A blank user name and password cannot be used in the REST API for any of the configuration calls.

Web Authentication

Refer to Web UI Programming-Authentication Overview and Examples of how to return a token from the OAS Engine.

Remote Service Credentials

For all remote OAS Engines that will communicate to this OAS Engine go to Configure-Options-Remote Services for the remote nodes and set the Security User Name and Security Password.

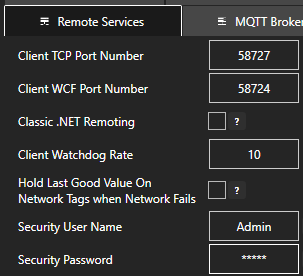
Configure Options

Remote OAS Engine Security

These properties will allow the OAS Engine to run under this defined user account to give remote client access privileges for Read Tags for Calculations and Data Logging, and for Realtime Alarms for Alarm Logging and Alarm Notification. This is important if the remote OAS Engines have Security restrictions for these features.

OPCSystems.NET DA OPC Server Credentials

To set the user name and password credentials of the classic OPC DA OPC Server OPCSystems.NET edit the file DANSrv.exe.config at set the UserName and Password properties.

<add key="UserName" value=""/>
<add key="Password" value=""/>

OAS OPC UA Server Access

To provide authentication to remote OAS Engines of the OPC UA Server go to Configure-Options and set the OPC UA Security Access to either OASServiceUser or OPCClientUser.

Configure Options

Overview – Security

Security is included for free with all of the product features of Open Automation Software. However, there are several security considerations you need to review to ensure your data is not improperly accessed or modified.


Hardware Security

At its most basic, hardware security means ensuring your server infrastructure cannot be physically accessed by unauthorized users, and has redundant power supplies for uninterrupted operation. This can be accomplished either on site or by utilizing 3rd party hosting facilities.


File System and OS Security

At the next level above hardware security are the servers’ file system and operating system.

  • Whether you are using Windows or Linux, be sure to only allow access to log in and configure the operating system with a valid account.
  • Never distribute the system administrator or root user account credentials to anyone who is not managing server installations or performing maintenance on the server.
  • Disable remote logins in your operating system by unauthorized administrators

OAS stores server configuration files in directories of your choosing. Be sure only OAS server administrators have access to these directories and files. You can locate where these files are stored in the OAS Configuration Application under Configure > Options and selecting Default Files.


Network Security

At the most basic transport level, be sure to only allow access to the OAS server ports from only authorized systems and users. This can be done using built-in operating system firewalls or external firewalls on your company network. The following are default ports used by OAS which can be changed in the OAS Configuration Application under Configure > Options, then select Networking:

  • 58724 : Legacy server administration and server-to-server WCF communications
  • 58725 : Web product and REST API communications
  • 58727 : Server administration and server-to-server TCP communications
  • 58728 : OAS OPC UA Server Port

For secure one-way communications between OAS servers, see our documentation on setting up a Unidirectional Network Gateway.

For secure Web and REST API communications, enable SSL within OAS and apply a certificate on the HTTP listener. Learn more here.

Securing communications drivers can be done using the specific settings of each, utilizing either secure credentials as well as 3rd party issued certificates, or both.


Vulnerability Protection

Open Automation Software incorporates several protection safeguards within the software routines and verification with Security Code Scan to analyze vulnerability patterns.

Secure Data Transport

  • All service to service and client to service communications from .NET assemblies use a custom packet encryption that is not publicly known to protect against threats exposed to open encryption libraries.
  • Packets are additionally compressed to a binary stream.

SAST – Static Application Security Testing

OAS utilizes Security Code Scan on all code used to create the OAS Engine and applications before deployment. Security Code Scan detects vulnerability patterns and has a comprehensive list of rules to follow when coding. This helps enforce good coding practice to protect against security risks.


Database Security

When logging OAS Tag data to an external database, it is recommended that you use a unique credential for each database and to not use the database administrator credential (e.g. ‘sa’ on MS SQL Server). In this way you can limit OAS Data Logging Groups from reading and writing to only the databases and tables required for your desired functionality.

See documentation on Data Logging Groups for more information.


Feature Security and Authorization

Every feature within OAS can be secured, even down to the individual Tags and Tag Groups. This is accomplished using the OAS Security Groups and Users features. In a production system, always create the groups, users, and access rules you require, then disable all features on the Default Security Group.

View the Getting Started section on Configure Security to follow simple steps and also the OAS Configuration – Security section for all property attributes for Configure-Security.

Other resources for Security: Programmatic Access Security Groups