Getting Started – .NET Core for iOS and Android
NOTE: The OASPCL assembly still ships with the OAS Platform installation for legacy support, but we have now made the OASData and OASConfig assemblies compatible with Xamarin projects. More information on how to use these assemblies can be found here:
OASData – real time data access
OASConfig – programmatic platform configuration
Prerequisites:
- Windows Development for iOS and Android apps
- Visual Studio 2012 or newer (2017 or 2019 Recommended) for Windows
- Xamarin Android Player or Android Emulator (if building Android Apps)
- Separate machine or Virtual Machine with Mac OS X and XCode (if building iOS Apps)*
— or —
- Mac Development for iOS and Android apps
- Visual Studio for Mac (download)
- Deployment
- An active subscription to the Apple Developer Program for iOS distribution via the App Store
- An active Google Developer account for Android deployment via the Google Play Store
*Note: when developing for iOS with Visual Studio for Windows, you will need to have access to a Mac on your network that has XCode installed. Debugging and execution on the iOS Simulator actually runs on the connected Mac and not on the PC hosting Visual Studio.
For more information about Xamarin Requirements for iOS development on Windows see the following: https://developer.xamarin.com/guides/cross-platform/getting_started/requirements/#windows
Step 1 – Install Xamarin Forms or VS for Mac
The instructions below are for Visual Studio 2015. Read more on Installation of Xamarin Forms for all versions of Visual Studio including VS 2017 for Windows.
See the following for Installation of Visual Studio for Mac.
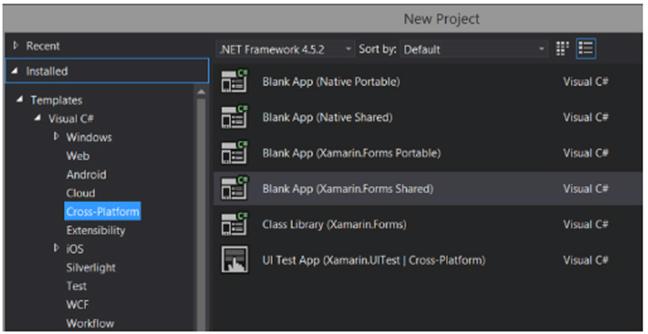
Step 2 – Create a New Visual Studio project
Create a new project in Visual Studio. If Xamarin is installed properly, this will be under
Templates > Visual C# > Cross-Platform.
Select the project type of Blank App (Xamarin.Forms Shared). This will create a single shared application code base, and individual projects for each deployment target, including Android, iOS, Windows Universal Platform, Windows Phone and Windows.
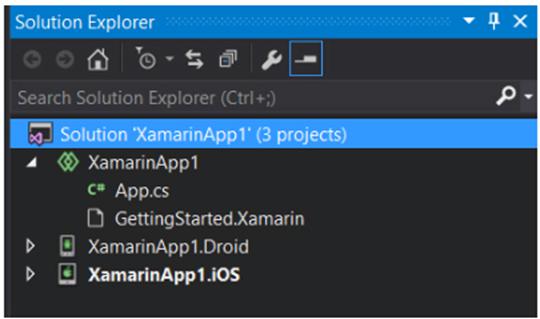
For this project we’ll only be using the Android and iOS projects, so once the solution is created, remove all other project targets so you’re left with just the shared app code and the projects for the the desired targets.
After clearing out the extra projects, your solution should look like this:
Step 3 – Add OAS Component References
Add references to the OAS assemblies. These are located in your Open Automation Software installation directory (typically C:\Program Files\Open Automation Software\OAS).
You need to add references to the following files in every individual deployment target project. So in this case, you need to add these references to both the iOS and Android projects.
OASData.dll
OASConfig.dll
These assemblies are the .NET Core Open Automation Software components for reading and writing Tag data and for configuring OAS Platform settings.
Step 4 – Code: add component instances
Update shared source code in the App.cs file. This will house all of the application code and will be shared by both iOS and Android projects to make it easier to maintain code for multiple devices.
First, add in a reference to the OASPCL namespace, along with application-level variables.
using System;
using System.Collections.Generic;
using System.Linq;
using System.Text;
using OASData;
using OASConfig;
using Xamarin.Forms;

namespace XamarinApp1
{
   public class App : Application
   {
       OASConfig opc = new OASConfig();
       OASData opcd = new OASData();
       string server = "10.211.55.3"; // your machine IP
       bool bPumpSet = false;
       bool bPumpVal = false;

       Label lblSine = new Label {
           Text = "Loading...",
           HorizontalTextAlignment = TextAlignment.Center
       };
       Label lblPump = new Label {
           Text = "Loading...",
           HorizontalTextAlignment = TextAlignment.Center
       };
       Button btnPump = new Button {
           Text = "Toggle Pump"
       };
The OASConfig component is used to configure OAS Server and tag settings, and is not used in this example, but the OASData component is.
This is used to monitor tags, fire events when values change on the server, and also to update values on the server. These are the local variables used:
- Server – A string that holds a reference to the IP address of your OAS server where we will be reading and writing data.
This may be the localhost of the machine with Visual Studio, but the compiled mobile apps may not be running locally, so localhost or 127.0.0.1 may not work.
This needs to be the IP address on the network for your OAS server. - bPumpSet – A boolean flag that determines if we have gotten values from the server for the Pump.Value tag so we know when it’s safe to allow updates.
- PumpVal – A boolean to hold the current value for the Pump.Value tag.
- lblSine – A Xamarin Forms label to display the value of the Sine.Value tag
- lblPump – A Xamarin Forms lable to display the value of the Pump.Value tag
- btnPump – A Xamarin Forms button used to toggle the value of Pump.Value
Step 5 – Code: handle events
Now we’ll add some code to monitor server tags and handle updates when values change. The AddTag method adds a tag to the list of tags to monitor. You can also use the AddTags method to add more than one at a time.
The ValuesChangedAll event is fired every time the server values have changed for any tag being monitored. This event will be passed a list of tags, values, data qualities, and timestamps for each update. If values have not changed for some tags, they will not be included in the arrays passed to the event.
protected override void OnStart ()
{
   // set up tags
   opcd.AddTag(string.Format(@"\\{0}\Sine.Value", server));
   opcd.AddTag(string.Format(@"\\{0}\Pump.Value", server));

   // set up event handler
   opcd.ValuesChangedAll += Opcd_ValuesChangedAll;
}

private void Opcd_ValuesChangedAll(string[] Tags, object[] Values, bool[] Qualities, DateTime[] TimeStamps)
{
   // iterate thru received values and update display
   Device.BeginInvokeOnMainThread(() => {
       int idx = 0;
       foreach (string t in Tags)
       {
           if (t.Contains("Sine.Value") && Values[idx] != null)
           {
               lblSine.Text = Values[idx].ToString();
           }
           if (t.Contains("Pump.Value") && Values[idx] != null)
           {
               bPumpSet = true;
               bPumpVal = (bool)Values[idx];
               lblPump.Text = bPumpVal.ToString();
           }
           idx++;
       }
   });
}
In the event handler, we will iterate through the list of tags and update labels when their respective values have changed.
Note: We must execute UI updates within a Lambda (a C# anonymous function) tied to the Device.BeginInvokeOnMainThread. This hands over the execution to the main UI thread. If this is not done, crashes or unexpected results could occur.
Step 6 – Code: update screen
The last bit of code will be to handle the clicking of a button and triggering an update on the server when that happens. First we’ll update the App constructor to include the new labels and button in the layout. Then we add a Clicked handler to the button.
public App ()
{
   // The root page of your application
   MainPage = new ContentPage {
       Content = new StackLayout {
       VerticalOptions = LayoutOptions.Center,
           Children = {
               lblSine,
               lblPump,
               btnPump
           }
       }
   };
   btnPump.Clicked += BtnPump_Clicked;
}

private void BtnPump_Clicked(object sender, EventArgs e)
{
   // change pump value here
   if (bPumpSet)
   {
   Device.BeginInvokeOnMainThread(() => {
       opcd.SyncWriteTags(new string[] {
           string.Format(@"\\{0}\Pump.Value", server) },
           new object[] { !bPumpVal });
       });
   }
}
We use the SyncWriteTags method to send up a list of tag/value pairs. In this case we’re just sending up the Pump.Value tag and the inverse of the current value to effectively toggle it.
Step 7 – Building and testing for Android
Start by running the Xamarin Android Player. If you do not have this installed, you can download it here. You’ll then need to download and install device images that the Player will use. For this example, we chose the Nexus 7 with Marshmallow build of the Android OS.
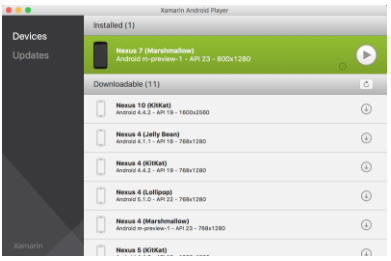
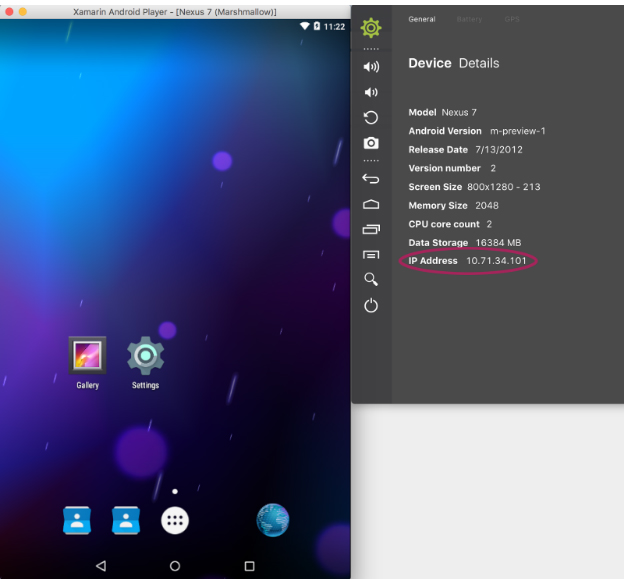
Once you’ve downloaded the device image you can start it up by hitting the Play button. This will run the device emulator. After the device has started, you can then click on the gear icon to get details. The important field is the IP address. We’ll use this to connect Visual Studio for debugging.
Now, you can go back to Visual Studio, select the Android Project, to be sure we’ll be debugging that one and not the iOS version. Select Debug to ensure we are in Debug and not Release mode. Then go to the set of icons in the toolbar and select Open Android Adb Command Prompt:

When the command prompt opens, enter the following command:
adb connect 10.71.34.101
Replace the IP above with the IP of your Android device.
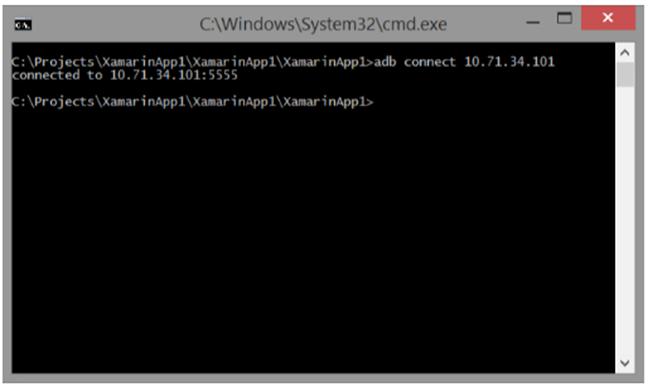
You should see a successful connection. You’re now ready to debug the project.
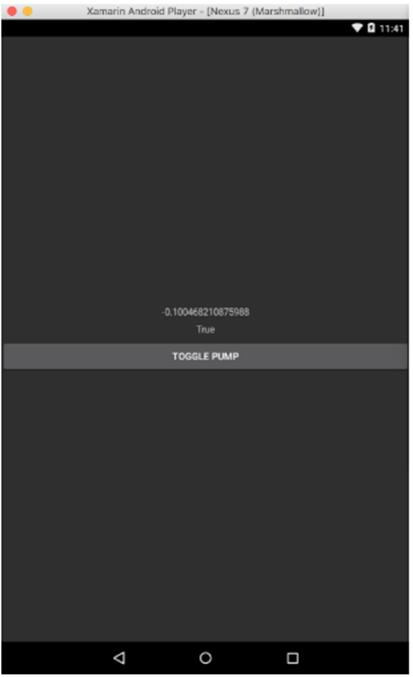
In the Visual Studio toolbar, make sure your Android Device is selected as the target and then select Start Debugging. The project will build and then be deployed to the device.
Note: If you get an error related to missing “provisioning profiles”, this is common. To fix it, select the iOS project, then be sure to select the iPhoneSimulator as the target. Then return to the Android project and try again. Even though we were debugging the Android project, the iOS project will compile and throw errors.
Step 8 – Building and testing for iOS
As stated earlier, to build and test an iOS app, you must be connected to a Mac on your network. This Mac must have XCode installed along with the Xamarin Mac Agent. This allows Visual Studio to connect to the Mac and use its Simulator for debugging.
The simplest way to get the Xamarin Mac Agent on your test machine is to install Xamarin Studio for the Mac found at http://www.xamarin.com/download.
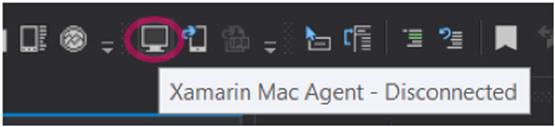
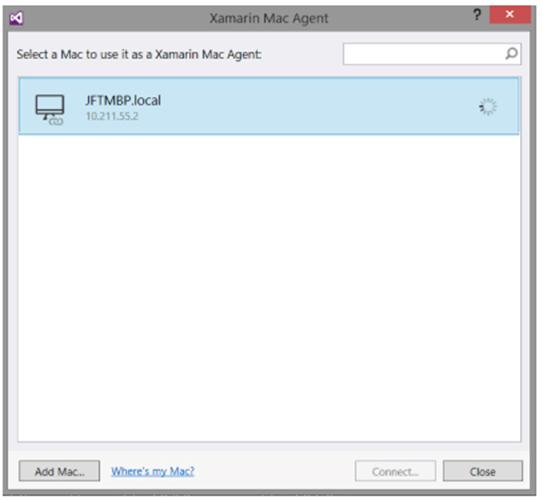
Once you have your Mac configured and accessible on the network, return to Visual Studio to connect by selecting Xamarin Mac Agent from the toolbar:
Locate your Mac in the list and click Connect. If it is not on the list, click Add Mac… to enter connection details manually.
Once connected, the toolbar icon will change and the link icon will appear in the Xamarin Mac Agent dialog:
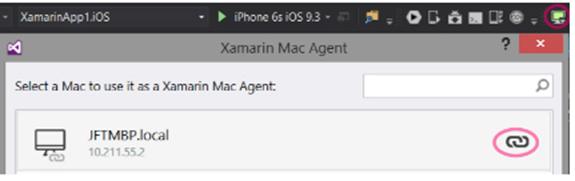
You can now select the iOS project and target the iPhoneSimulator, choosing the model you want to test. In this case we’ve chosen the iPhone 6s. The models and iOS versions available to you will depend on the version of XCode and Simulator installed on your Mac.

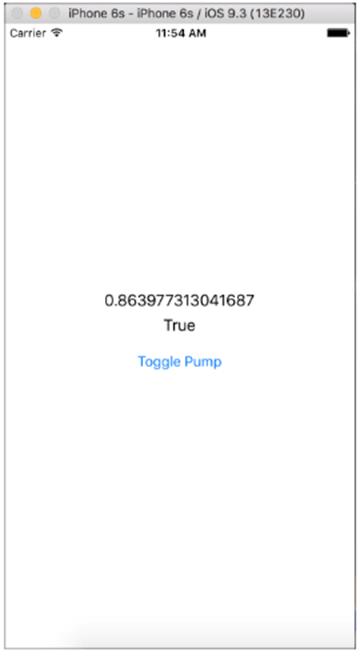
Now select Start Debugging and the app will compile, deploy to the simulator and start. Switch over to your Mac and you should see it running.
As you can see, the labels and button are similar to those on the Android version, but particular to the iOS app. This allows you to develop an app that is familiar to each target platform user while remaining on a single code base.
Resources
For more details on how to use the OPCSystemsComponent or the OPCSystemsData components, you can refer to the Programmatic Interface section of our online help. The PCL versions of these components have the same interface as the standard .NET components, so all code examples will function in the same way.
Xamarin Tools and Support
https://www.xamarin.com
Xamarin Android Player
https://www.xamarin.com/android-player
Additional Demo Applications
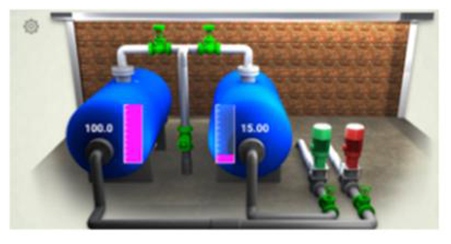
OAS Tanks HMI for iOS and Android