UDI for Raspberry Pi GPIO
The Raspberry Pi has quickly become a popular device used to prototype or become the core of an Internet of Things (IOT) component. Being a small, single board computing platform allows it to be used where conventional computers would either be too large or unable to withstand environmental forces. Yet, because it runs a variant of Linux, it is a fully functional general purpose computer.
Pi devices were designed to be modified and expanded. As such each model includes many I/O ports as well as a bank of pins called the General Purpose I/O pins or GPIO. These pins are addressable, can be configured for either input or output, and in some cases can even support serial communication. The most common use is reading and writing boolean values.
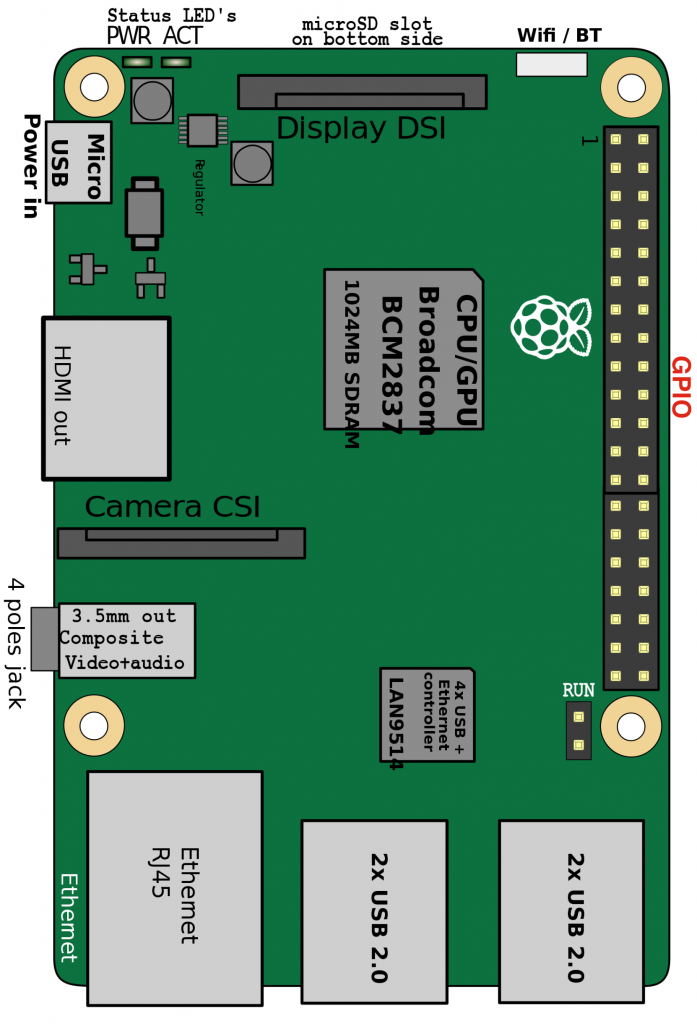
In this diagram of a Raspberry Pi 3, you can see the bank of 40 GPIO pins on the right hand side. Older models only include 26 pins, and some models arrange them differently to fit on the PCB.
The Challenge
There are many open source libraries for reading and writing GPIO pin statuses in many different languages and operating systems. But rapidly prototyping an IoT device comes with many other challenges. So our goal was to produce a driver for the OAS Platform to allow an OAS server to communicate with a Pi device and access GPIO data, all without an admin or end-user needing to write code for each deployment. In short, we wanted to create a driver that behaves like existing OAS native drivers and is configurable through the OAS Configuration tools.
The Universal Driver Interface
With the release of the OAS Universal Driver Interface (UDI) SDK, developers can now create their own custom device or data drivers which act like and live side-by-side with existing native drivers such as our Allen Bradley or Siemens PLC drivers. In addition, UDI implementations can be deployed at the data source and be configured to communicate with a remote OAS server. This ensures that the data is captured reliably from the data source and transmitted to OAS as long as a network connection can be established.
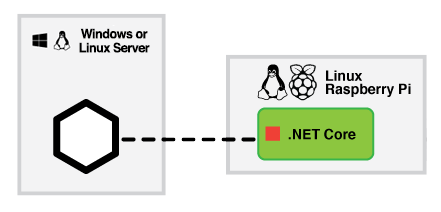
The UDI for the Raspberry Pi GPIO acts as a conduit between the GPIO Data and OAS.
The technology that makes this possible is the .NET Core Framework, which can run on a Linux device.
Remote Driver Hosting
Built-in or “native” OAS Platform drivers such as the Allen Bradley and Siemens PLC drivers are part of the OAS services that run on a Windows server. But since the UDI libraries are based on the .NET 2.0 Standard, UDI drivers can be compiled to execute on any environment that supports the .NET Core runtime. This means you can host a custom driver on a remote device or server such as a Raspberry Pi, thus making data capture more efficient and distributing the load of your solution.
Tag Configuration
Another powerful feature of the UDI is the ability to define custom tag properties based on the driver. So when a Tag’s data source is selected as your UDI driver, your custom properties are displayed in the Tag configuration screen. In the case of the Pi GPIO UDI, we expose properties to control which GPIO Pin is mapped to a tag, and the data direction (input or output).
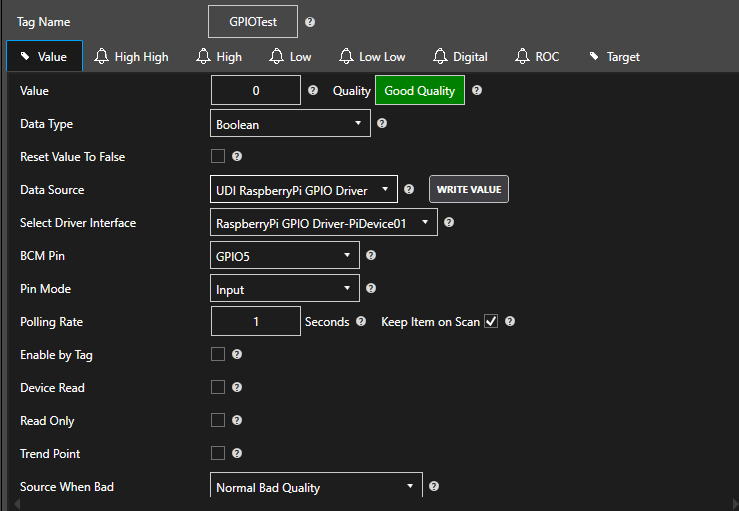
By changing the Pin Mode, this actually alters the Pin Mode within the the Pi device itself. Selecting the BCM Pin maps the Tag to the Pin using the BCM pin numbering scheme.
Output Pins: the tag value will be set to the pin value on the device
Input Pins: the tag value will be set to the current pin value on the device, and will also allow you to set the pin value on the device by setting the Tag to a boolean True or False.
Connection and Configuration on Startup
Each deployment of the Raspberry Pi UDI can be configured using an external file. This configuration file contains fields for uniquely identifying the device, as well as setting the remote OAS server address and port. When the driver spins up, it will make a network connection to the OAS server and begin transmitting data when an OAS Tag has been configured. Additionally, a UDI can be written to actually create and configure tags on a remote server, so that a deployment does not require any manual keying of Tag configuration fields, reducing errors and ensuring each follow on deployment can be completed with minimal effort.
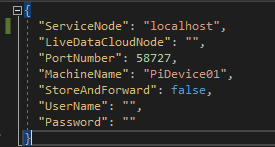
The appsettings.json file:
ServiceNode: the remote OAS server address
PortNumber: OAS Server port
MachineName: the unique name for the device hosting the UDI Driver
Project Source Code
This UDI implementation for the Raspberry Pi is fully functional, but can be used as the basis of your own projects. Source code is available in C#, and requires the following:
- MS Visual Studio 2017+
- .NET Core 2.0+ Libraries
For more information on the OAS Universal Driver Interface and how to develop your own, see the following articles: