Getting Started – Unidirectional Network Gateway
The UDP Broadcast feature is used to transfer values through Unidirectional Network Gateway with communication diodes that only allow traffic to go one way.
This networking feature is only needed when bidirectional communications is not allowed. The feature is included for free in all OAS systems.
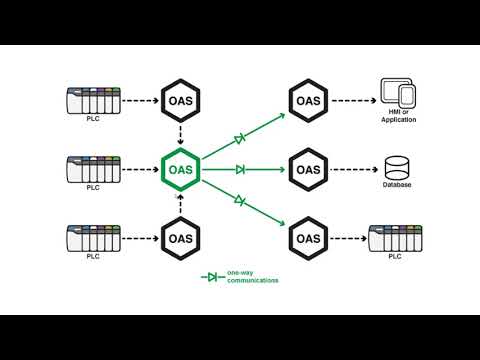
The feature supports broadcasting data from any tag variable from a the local server or remote servers within the DMZ to unlimited number of receiving servers. Each receiving server can be setup to receive data from multiple broadcast servers providing many to many data transfer.
Use the following steps to setup servers to broadcast data and receiving services to update local and remote tag variables from the broadcasting nodes.
The receiving nodes need to have a fixed IP address, registered domain name, or network node name. The broadcasting nodes do not need to have a fixed IP address.
Step 1
 Start Configure OAS application.
Step 2
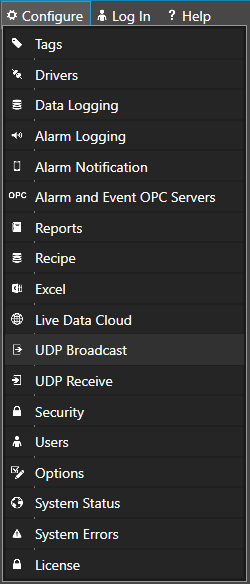
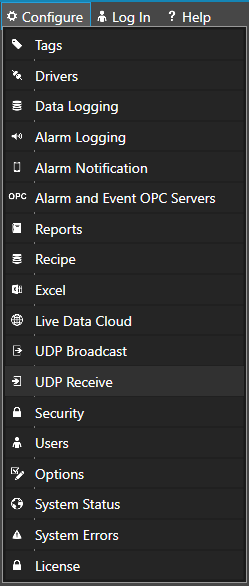
From the data source service select Configure-UDP Broadcast.
Step 3
Select the Local OAS Service by selecting the Select button next to the Network Node drop down.
![]()
Step 4
Click the Checkbox to Enable UDP Broadcast and enter the Server Port number and Broadcast Rate which is the rate all values from this service will be broadcast to the receiving clients.
Click on Apply Changes.
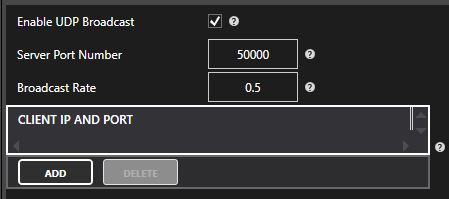
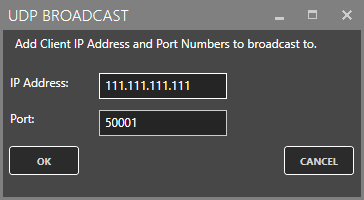
Click the Add Button and enter each receiving client IP Address and Port Number in the popup window and click OK.
Step 5
Choose to send all tag values from the local service on each broadcast or uncheck the property Send All Local Tags to define a list of tags from the local system, remote systems, and all variables.
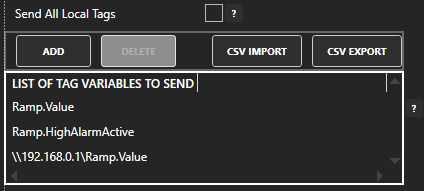
By defining which tags to broadcast has the following benefits over Send All Local Tags.
- Reduced network packet size on the broadcast if the number of tags sent is less then the number of local tags.
- Can broadcast any Tag Variable, not just the Value.
- Can broadcast tag values from other remote nodes within the DMZ.
Step 6
Select the Save button on the toolbar at the top.

Step 7
Save the file myUDPBroadcastServer.UDPBroadcast in the directory of your choice.
You can specify for this configuration to load automatically when the Service starts using Configure-Options to specify this default UDP Broadcast file.
Step 8
From the receiving service select Configure-UDP Receive.
Step 9
Select the Local OAS Service by selecting the Select button next to the Network Node drop down.
![]()
Step 10
Click the CheckBox to Enable UDP Receive and enter the desired watchdog rate. The watchdog rate is the amount of time it will wait before setting the receiving tags quality to bad without receiving a broadcast.
Click on Apply Changes.
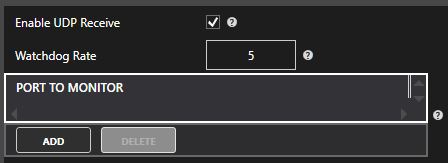
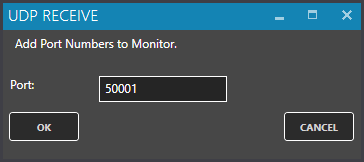
Click the Add Button to add a Port Number to listen on and select OK. You can enter multiple receiving port numbers.
Step 11
Select the Save button on the toolbar at the top.
Step 12
Save the file myUDPBroadcastClient.UDPReceive in the directory of your choice.
You can specify for this configuration to load automatically when the Service starts using Configure-Options to specify this default UDP Receive file.
Step 13
In the receiving node select Configure-Tags. Add Tag’s with the Data Source of UDPClientTag and enter the Tag name of the broadcasting node you want to receive the value from.

Keep in mind you may not be able to browse for the tag name from the broadcast node, so you may have to manually enter it or use Tag CSV Import or programmatic tag setup using .NET or REST API to setup multiple tags.
The Tag defined must match the broadcast tag name defined in Step 5.
Examples:
- Ramp.Value
- Ramp.HighAlarmActive
- \\192.168.0.1\Ramp.Value
Save the Tag Configuration file and specify it to load automatically under Configure-Options-Default Files.